Monday, 5 March 2007

Mod One Day Four

Todays exercises included making up compression joints (types A and B) and soldering end feed elbows and Tees.


A Type A compression contains an "olive" which compresses around a pipe when a nut is tightened. This makes a water tight joint. Theres a description and picture listed here on Wiki


Type B fittings have a flared end instead of an "olive" as shown below. This prevents the olive coming loose since it is incorporated into the pipe itself.


The morning session comprised of measuring and soldering different joints and cutting pipes to length to make a simple jig or simple circuit of joints. Essentailly it was 4 pipes of different bore and 4 elbows. This proved to be a run through for an assement that afternoon althought the afternoon session proved to be far more involved.

The small circuit was quite simple to construct and once complete it was pressure tested upto 5 atmospheres (5 bar).

The afternoon assessment consisted of a G shaped jig which was again constructed of 23 and 15mm pipe. The circuit contained the following fittings

1. 2X capillary lebows
2. 2X end feed elbows
3. 1X (15 by 15 by 23 mm) Tee
4. 1X type A (23 by 23 by 15mm) compression Tee
5. 1X Type B compression Tee
6. 2X tap end connectors.

These were all joined with copper pipe and again as in other assessments, the measurements needed to be within a 2mm tollerance.

One of the problems that became clear was that although it was possible to cut the pipes at the correct lenghts, the soldering process needed to be very precise as all the joints needed to be soldered so the jig stayed flat and that i didnt solder in twists into the pipework. I found that i had to resolder/remove a few joints due to this factor.

After a few joint changes and a bit of juggling i managed to get the jig square and the meaasurements accurate. It was measured by the tutor and then pressure tested to 5 bar.

I passed the assessment and then was told to read up on fire safety in my BTSC manual, which i would be later tested on.
Sunday, 4 March 2007

Mod One Day Three

Today we learned that we'd be spending all day in the workshop but also found out that we'd be having an assessment on the 7 bends we'd been practicing....although id only done 6 of em!

Our tutor told us that an "assessor" would be marking the accuracy of our bends, which worried us all as we'd only had about an hours practice on each bend, and some of us hadn't even completed the 7th bend.

I manged to get the simple 90 degree and 45 degree bends ok followed by the the 's' bend in 2 planes with in the first 40 minutes. From here on in it started getting tricky!

The next bend proved more difficult! The 45 degree passover failed due to a small amount of "wobble" in the pipe. Since there were 2 bends in the assessment piece, when it was placed flat on the workbench there was a small gap under one of the bends, so when it was pressed at one end, the other end raised itself from the table. Fail.

I wasnt too concerned at the time as i only had 4 more bends to do and i quicky managed to produce another passover which was deemed acceptible by the stickler of a assessor.

So id completed 4 of the 7 and commenced my next bend, the 3 bend passover ( _/\_ ).

This prove more difficult as all 3 bends had to be both accurate in angle and in the same plane. I managed to fluff this bend half way through so didnt even bother getting it assessed. I started another only to find that the clearance under the bend was too great! It was supposed to be just 15mm but mine was nearer 20mm and with an accuracy of 2mm required, this one wasnt even close.

By now im getting quite worried as if i failed to complete all bends accurately, id fail the assessment and have to retake it and pay for the workshop and assessment time. Three bends to go and fortuntely our own tutor returned to mark the rest of our assements. Whilst I felt more comfortable being marked by my tutor, i still managed to mash up my next piece. The 3 bend passover was again a wobbly piece, but i reckoned it was within the 2mm acceptable range.
Unfortuntaly not and another FAIL.

Still 3 bends to go and only an hour left! The 4 bend passover was another fail. Again the clearance under the bend was too great. Two more attempts and it eventually passed.

One more bend to go and 20 minutes left. The 2 bend passover, which i hadnt even magaged to practice during the monday and tuesday workshop demos!
Attempt one was a fail. Attempt two was a fail and that was time up. I was now quite concened that id have to pay to resit the assessment, however our tutor allowed those who hadn't completed the last bend (about 5 of us) to stay in the workshop and attempt it over lunch.

I duely stayed behind and spent the next hour atempting to manufacture 4 of the required bends. I wasnt going to fail this assessment! After lunch, the first bend i submitted was accepted and the assessment was complete. Phew.

After lunch we then were introduced to Mr Propane Torch. We had a demo of how to complete a soldered joint after which we could attempt our own joints. The afternoon passed quickly and i was quite pleased with my efforts at soldering.

Mod One Day Two

Today was pretty much a continuation of day one with pipe bending in the morning and theory in the afternoon.

Today i managed to get through the next 3 bends but got through quite a bit of copper pipe. I seemed to have problems with the passover dimensions as there needed to be a 15mm clearance under the passovers which i couldnt seem to manage.

The afternoon session consisted again of theory and health and safety but we also had to watch and answer questions about a video on the dreaded "ASBESTOS".

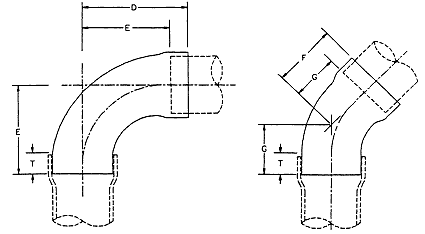
We then were given a lesson in how to work out "x dimensions" which was how to accurately work out the the distance between the width of an elbow minus the depth of the joint seating.

E.g If you have two elbows which need to be 300mm apart, how long should the piece of adjoining pipe be to join them?

Its a simple calculation, but its difficult to explain without a diagram.


Essentially the x-dimentions in the above joints are dinemsions E and G which are unknowns.
You are give dimension D and the depth of the elbow and you deduct this measurement from the 300mm adjoining pipe length.

If D is 40mm and the depth of the elbow is 15mm then the x dimension (E in diag above) is 40 - 15 = 25mm, so if the distance between the midpoints of a left and a right elbow is 300mm, then the pipe length needs to be 300 - (2x25) = 250mm.

The afternoon task was to work out the x dimensions for several fittings and then calculate the lengths of pipe required.

Apparently this method is not used to calculate pipe lengths and is generally only a method of pipe layout design.

Module One Day One

I arrived early and was directed to a workshop where i met 12 other newbies just like me. They ranged from property developers to actors so it was a mixed bunch. Our first task was a health and safety assessment about how to lift objects safely followed by demo/practical in pipe bending. There were about 8 different bends which we were shown which consited of:

1. 90 degree single bend
2. a 45 degree bend
3. 2 opposite 45 degree bends (s shape or 45 degree "passover")
4. 2 90 degree bends in 2 planes ( s shape with one leg bent straight up instead of flat)
5. a 3 bend passover (a straight pipe with an 'v' shaped bend in it _/\_)
6. a 2 bend passover as above without the last bend. (_/\ )
7. a 4 bend passover ( _/ \_)

i managed to get through thee first 3 bends before lunch and went through quite a bit of copper pipe.
All of the bends were to be be accurate to 1 degree and measurements had to be accurate to within 2mm.


After the lunch break it was into the classroom for some plumbing theory and health and safety.